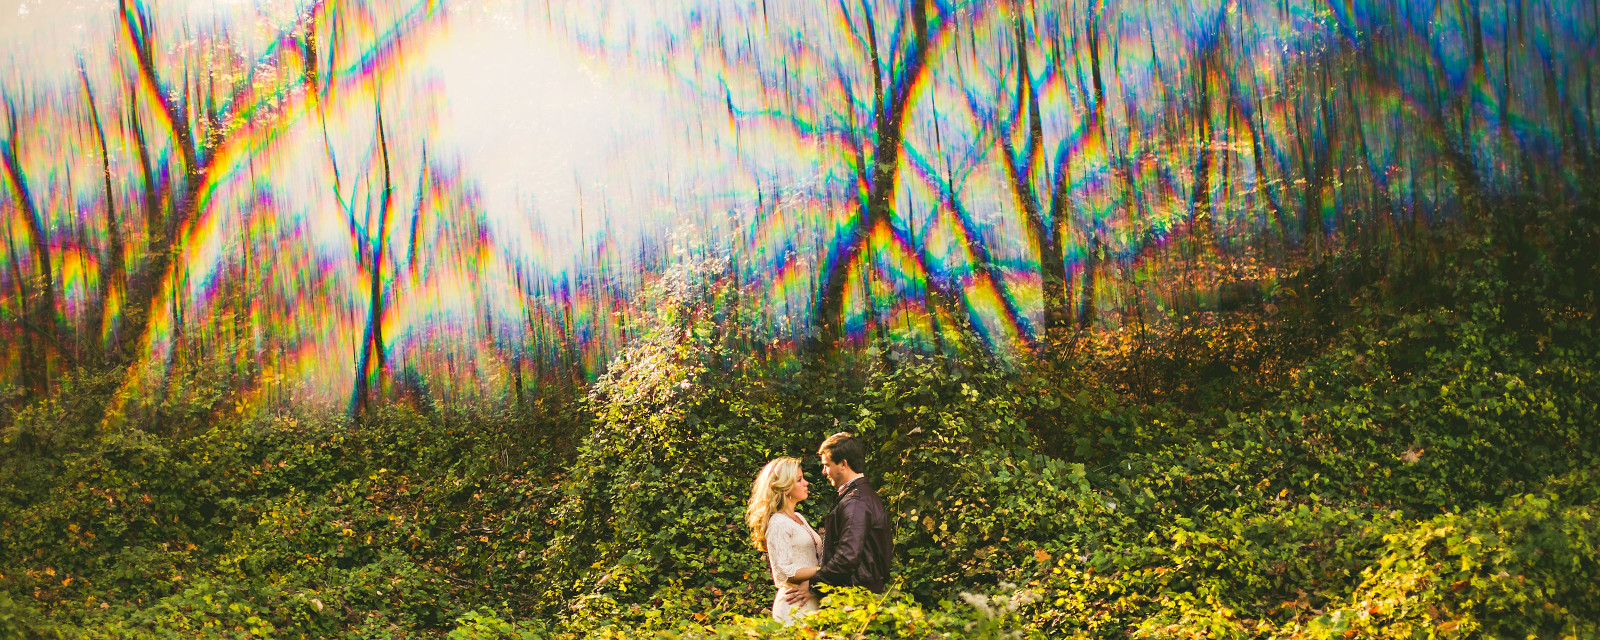
Now that I’ve moved on a developed a few other photography techniques it’s time for me to explain an older one I used a good bit throughout the 2012 wedding season. I call it prisming (others are starting to call it “hurding”) but it’s really just reflecting images in front of your camera lens using a prism. It took me a while to try a variety of prisms before I found the perfect one (for me).

Many photographes have used things such as iphone screens or mirrors to create interesting and artistic looking images, but I’ve found that using a 6 inch triangular prism works best for me because you can twist the prism into creating a curve and bend-like distortion of your surroundings. It takes a little more practice than just holding it up to your camera lens and reflecting stuff. This makes things look much more natural in my opinion. It doesn’t scream “cheesy!” “something done in photoshop!” because, well it isn’t done in photoshop.

You also get the ability to create a natural rainbow effect in the right angle and lighting situations

But it’s also proven to be a very versatile tool for me. You don’t have to go crazy with bending and rainbows for it to create really unique looking images.

It’s a pretty simple techinque, but much like freelensing and the brenizer method it takes a LOT of practice to pick up on the nuances and characteristics of using it.
I find it works best with a 24mm, 35mm, or 50mm lens and I’ve ONLY ever used it with live view… because live view is freaking amazing.
Here is a video taken with my nikon d4 demonstrating the real time effects of the technique
I talk a lot more about how I actually rotate the prism and look for situations that it’ll yeild the best results at my workshops (yes I will also be having one in the US this year), but I encourage you to go out and give it a try yourself. The key is just having it with you all the time so when the right situations arise… you’re ready for it.


I can’t recommend trying this enough. Pick up a prism (heck – pick up anything you can shoot through) but decide on something and stick with it. It’s fun to try tons of different objects to shoot through and almost anything will make an image look “different,” but the key is actually sticking with the same item over and over so you start to pick up in the unique characteristics of it and eventually learn to use it quickly and effectivly — which we all know is incredibly important in the field of wedding photography.
This prism is just what’s worked best for me. I got mine here.

Photography by Washington DC Wedding Photographer Sam Hurd

Thank you! Thank you! Thank you! I loved your use of prisms and I can’t wait to try it out. Amazing photography. Thank you for the inspiration.
awesome-sauce… love this. thanks for sharing oh great master
When I saw that first image in your 2012 review, it bent my mind. I’m so glad you shared your secret
An amazing photographer that shares his secrets? What is this craziness??
Thanks for sharing, Sam. Can’t wait to hear the details on your US workshop.
a method so good you named your band after it..
I dig. Thanks for sharing!!!!
You are the Best!
Awesome, thank you so much Sam! And… Come to europe for a workshop please?! I’ll keep asking until you say yes
Thanks a bunch for sharing this Sam! Really appreciate it dude. Can’t wait to give “The Hurd Method” a shot.
you’ve been doing this forever! i remember you had a prism at the wedding we did with ryan. cool stuff, sam, and nice of you to share.
I’m disappointed. I genuinely thought you were magic
Science!!
GOOD FREAKING GOLLY. I’ve been trying to find this technique for so long ever since I saw the Nastia Liukin photoshoot. BLESS YOU for posting this up, this is HUGE!
Very interesting idea. Thanks for sharing!
I appreciate your creativity. Well done
haha…and now they’re sold out on Amazon. You must have quite the following…
I’ve gotten some neat results using an old loupe as my lens, though it’s not recommended since you’re pulling in dust, etc with every shutter release. But a cool trick if you have an old DSLR lying around.
Looking at these images had been making my head hurd! Thanks for sharing the ‘secret’!
Wow, this is amazing. Now I’ve got something new I need to try! Thanks for all the sample images and instructions. I can’t wait to test this one out!
Dude this is excellent and so generous of you to share your secrets. I had recently been drawn to doing this before seeing your work just using wine glasses on a table and such but now…gotta step my game up!
So beautiful shoots, adorable indeed! Colors of the shots are amazing!
Great post! But how the heck do you hold a D4 one-handed for any length of time to do this regularly? Maybe my hand is just incredibly weak
Thx Sam
I’ll give this a try. I like using a cheap pieace of costume jewlery you can finad at any arts and craft store to infect the lens with some cool colors and light. A little cruder but out of 4-6 shots I alweays get one thats really interesting.
totally picking this up and practicing, practicing, practicing! thanks for posting. lovely images too!
Simple yet stunning results, amazed at how simple this is. Definitely worth a try. Thank you, something else to put in the camera bag!
WOWOWOWOW!
I read about your technique on fstoppers a few days ago and immediately ordered a prism. Thanks a lot for sharing your experience!
The prism really gave me some “creative mojo” back, that I thought I was loosing somehow.
Keep up your awesome work! And if you ever plan to hold a workshop in Germany, count me in
Nice technique and awesome results. cant wait to try.
This all looks so dreamy! I love the light up lettering.
Stunning images. Keep up the amazing captures. Very cool effect.
Cheers!
J
Good Sam, this is amazing really! So i finally purchased a prism…but now I have a silly question….how do you hold it on the lens…meaning do you just lean it on the lens border and flip the prism…anyhow, would it be possible to just get a pic on how you actually play with it on the lens ?
regards